

Last updated on 11. January 2023
Microsoft Defender for Identity (short MDI, formerly Azure Advanced Threat Protection, also known as Azure ATP) is a cloud-based security solution that leverages your on-premises Active Directory signals to identify, detect, and investigate advanced threats, compromised identities and malicious insider actions directed at your organization.
MDI has the following key benefits:
- Monitor users, entity behavior and activities with learning-based analytics
- Behavioral baseline for each user and monitoring/analyzing of activities like permission and group membership
- Protects user identities and credentials stored in Active Directory
- Gives you best-practices and insights of your configurations
- Identifies and investigates suspicious user activities and advanced attacks throughout the kill chain
- Identification of advanced threats at the source and shows the complete way from entry point to valuable asset
- Provides clear incident information on a simple timeline for fast triage
- Shows only relevant/important information and reduces the noise around the event. Uses smart analytics to stay focused on key points
In the first part we collected general information about Microsoft Defender for Identity and made clear, why you should implement it. Now we want to get started with the implementation.
Table of Content
- Which data is collected
- Hardware and Software prerequisites
- Licensing
- Permissions
- Active Directory prerequisites
- Firewall requirements
- Microsoft Defender for Identity communication
- Data location
- Event collection
- Create directory service account
- SAM-R
- Set gMSA in Defender for Identity
- Microsoft Defender for Identity installation
- Conclusion
Which data is collected
If you installed the MDI sensor directly on the domain controller, the following data is captured and inspected:
- Domain controller network traffic (local traffic of the domain controller)
- Windows Events
- RADIUS accounting information from your VPN provider
- Information about users and computers from Active Directory domain
- Network name resolution of users, groups and computers
- Relevant information is transmitted to the Defender for Identity cloud service
Hardware and Software prerequisites
To run the Microsoft Defender for Identity sensor on your machine, you have to make sure that you meet the specific criteria:
- Minimum 2 Cores
- Minimum 6GB HDD (recommended 10GB)
- Minimum 6GB RAM
- Power Option –> High Performance
- If running as a virtual machine, memory must be allocated fixed and not dynamic
- At least Windows Server 2012 (Core or with Desktop Experience)
- ADFS since Windows Server 2016
- Can be a Read-only domain controller
- .NET Framework 4.7 (is installed during installation but requires reboot)
- If NIC Teaming is in use, the Winpcap driver must be replaced: https://learn.microsoft.com/en-us/defender-for-identity/technical-faq#how-do-i-download-and-install-or-upgrade-the-npcap-driver
To get a better sizing, you can use the following tool from Microsoft to let it run on your server. It will measure the events and at the next point you can look which hardware requirements you need to keep the sensor running without interfering with the system:
Using the Microsoft Defender for identity Sizing Tool: microsoft/Microsoft-Defender-for-Identity-Sizing-Tool (github.com)
Licensing
In order to use the Microsoft Defender for Identity, you need for every protected user one of the following licenses:
- EM+S E5/A5
- M365 E5/A5/G5
- M365 E5/A5/G5 Security
- Standalone Defender for Identity license
Be aware that you cannot limit the access for MDI. This means you must get a license for every user which is protected by MDI, even if not every user should be protected by this solution. There is no technical way to allow the usage only to some users or in other words, there is no way to exclude users from not being analyzed.
Permissions
For MDI tenant creation you need one of the following permissions:
- Global Administrator
- Security Administrator
Active Directory prerequisites
Make sure that your domain meets at least the Forest level. The other prerequisites will be discussed later.
- Forest Level Windows 2003 and above
- Auditing of Events (we will get into this later)
- Directory Service account with read access to all objects (we will get into this later)
Firewall requirements
- Port 443 –> https://your-instance-namesensorapi.atp.azure.com
- Or Azure service tag AzureAdvancedThreatProtection
- For proxy usage check out the Microsoft documentation: Configure your proxy or firewall to enable Microsoft Defender for Identity communication with the sensor – Microsoft Defender for Identity | Microsoft Learn
Microsoft Defender for Identity communication
The following table lists the minimum ports that the Defender for Identity sensor requires:
Protocol | Transport | Port | From | To |
Internet ports |
|
|
|
|
SSL (*.atp.azure.com) | TCP | 443 | Defender for Identity sensor | Defender for Identity cloud service |
Internal ports |
|
|
|
|
DNS | TCP and UDP | 53 | Defender for Identity sensor | DNS Servers |
Netlogon (SMB, CIFS, SAM-R) | TCP/UDP | 445 | Defender for Identity sensor | All devices on network |
RADIUS | UDP | 1813 | RADIUS | Defender for Identity sensor |
Localhost ports | Required for Sensor Service updater |
|
|
|
SSL (localhost) | TCP | 444 | Sensor Service | Sensor Updater Service |
NNR ports (at least one of the following) | ||||
NTLM over RPC | TCP | Port 135 | Defender for Identity sensor | All devices on network |
NetBIOS | UDP | 137 | Defender for Identity sensor | All devices on network |
RDP | TCP | 3389, only the first packet of Client hello | Defender for Identity sensor | All devices on network |
Data location
It is not possible to decide, where your Defender for Identity instance is created. The location is based on the closest to the geographical location of your Azure AD tenant. Furthermore, it is not possible to move the tenant after it was created. Possible locations are Europe, UK, North America/Central America/Caribbean, Australia East and Asia.
Event collection
The following events must be audited as success and failure:
ADFS events
- 1202 – The Federation Service validated a new credential
- 1203 – The Federation Service failed to validate a new credential
- 4624 – An account was successfully logged on
- 4625 – An account failed to log on
Other events
- 1644 – LDAP search
- 4662 – An operation was performed on an object
- 4726 – User Account Deleted
- 4728 – Member Added to Global Security Group
- 4729 – Member Removed from Global Security Group
- 4730 – Global Security Group Deleted
- 4732 – Member Added to Local Security Group
- 4733 – Member Removed from Local Security Group
- 4741 – Computer Account Added
- 4743 – Computer Account Deleted
- 4753 – Global Distribution Group Deleted
- 4756 – Member Added to Universal Security Group
- 4757 – Member Removed from Universal Security Group
- 4758 – Universal Security Group Deleted
- 4763 – Universal Distribution Group Deleted
- 4776 – Domain Controller Attempted to Validate Credentials for an Account (NTLM)
- 5136 – A directory service object was modified
- 7045 – New Service Installed
- 8004 – NTLM Authentication
Configuring GPO
I would recommend using a new GPO to configure auditing for your domain controller, or if you already have a group policy for custom auditing of DCs, use this one. Navigate to:
Computer Configuration\Policies\Windows Settings\Security Settings\Advanced Audit Policy Configuration\Audit Policies
Configure the following audit policies and set the events to Success and Failure.
EventID | Category | Subcategory | Description |
4662 | DS Access | Audit Directory Service Access | An operation was performed on an objectNeeds Object Auditing |
4726 | Account Management | Audit User Account Management | User Account Deleted |
4728 | Account Management | Audit Security Group Management | Member Added to Global Security Group |
4729 | Account Management | Audit Security Group Management | Member Removed from Global Security Group |
4730 | Account Management | Audit Security Group Management | Global Security Group Deleted |
4732 | Account Management | Audit Security Group Management | Member Added to Local Security Group |
4733 | Account Management | Audit Security Group Management | Member Removed from Local Security Group |
4741 | Account Management | Audit Computer Account Management | Computer Account Added |
4743 | Account Management | Audit Computer Account Management | Computer Account Deleted |
4753 | Account Management | Audit Distribution Group Management | Global Distribution Group Deleted |
4756 | Account Management | Audit Security Group Management | Member Added to Universal Security Group |
4757 | Account Management | Audit Security Group Management | Member Removed from Universal Security Group |
4758 | Account Management | Audit Security Group Management | Universal Security Group Deleted |
4763 | Account Management | Audit Distribution Group Management | Universal Distribution Group Deleted |
4776 | Account Logon | Audit Credential Validation | Domain Controller Attempted to Validate Credentials for an Account (NTLM) |
5136 | DS Access | Audit Directory Service Changes | A directory service object was modified |
7045 | System | Audit Security System Extension | New Service Installed |

The event ID 8004 is for NTLM authentication and can also be enabled in GPO. Be sure to activate this only on domain controllers.
Navigate to:
Computer Configuration\Policies\Windows Settings\Security Settings\Local Policies\Security Options
Configure the following:
Security policy setting | Value |
Network security: Restrict NTLM: Outgoing NTLM traffic to remote servers | Audit all |
Network security: Restrict NTLM: Audit NTLM authentication in this domain | Enable all |
Network security: Restrict NTLM: Audit Incoming NTLM Traffic | Enable auditing for all accounts |
See the following screenshot for an example:

As you can see, these are not all the events listed above. The following event IDs are missing and must be configured separately: 1202, 1203, 4624, 4625, 1644
LDAP queries
The event ID for LDAP queries is: 1644.
Before activating the logging of this event, be sure to have sufficient memory, CPU and disk space because this event may impact the performance of your domain controller. Keep an eye on your server after you activate it, or if you already know that your server is sized to small, change it and activate it afterwards.
For activation you must create the following registry keys:
[HKEY_LOCAL_MACHINE\SYSTEM\CurrentControlSet\Services\NTDS\Diagnostics]
"15 Field Engineering"=dword:00000005

[HKEY_LOCAL_MACHINE\SYSTEM\CurrentControlSet\Services\NTDS\Parameters]
"Expensive Search Results Threshold"=dword:00000001
"Inefficient Search Results Threshold"=dword:00000001
"Search Time Threshold (msecs)"=dword:00000001
Object Auditing
Object Auditing can be set to audit every user, group and computer object or scoped on specific organizational units. It is necessary to configure this to collect event 4662 properly. In the following example I will activate it for the entire domain. Make sure that you have activated Advanced Features in Active Directory Users and Computers:

Right click on the domain and select Properties. If you want to scope it, right click on the OU.

Select tab Security and click on Advanced:

In the window that opens select Auditing and click on Add:

Click on Select a principal and in the new window type Everyone in the field, click on Check Names and then click OK:

In the dropdown for Applies to select Descendant User objects

Scroll down to the end and click on Clear all:

Click on Full control and after this deselect the following:
- List contents
- Read all properties
- Read permissions

After that click OK. If you go again into the settings from your newly created auditing, you will see that all Write all properties under Properties are selected:

You must do this for the following other object types:
- Descendant Group Objects
- Descendant Computer Objects
- Descendant msDS-GroupManagedServiceAccount Objects
- Descendant msDS-ManagedServiceAccount Objects
Select the specific entry in the Applies to section and repeat the steps above.

Exchange
To enable auditing for Exchange, we must enable the settings in ADSI. Start ADSIEdit.msc:

Right click on ADSI Edit and select Connect to…:

Just change under Select a well known Naming Context the dropdown to Configuration and select OK:

Expand the first Configuration node and right after this you will see a node that begins with CN=Configuration,DC= right click and select Properties:

Go to Security and select Advanced. In the new window navigate to Auditing tab and click on Add:

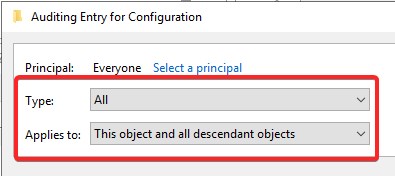
Click on Select a principal, type in Everyone, click on Check Names and on OK:

Set the Type to All and under Applies to select This object and all descendant objects:
Scroll down and click on Clear all:

Select Write all properties and click on OK:

If you check again in the newly created auditing, all write properties should be selected:

ADFS
I will not go much into detail for ADFS auditing because I have no test environment to demonstrate this. The event IDs for ADFS are the following: 1202, 1203, 4624, 4625. To sum it up you must enable auditing from Advanced Security Settings in AD console. Check out the following URL: Configure Windows Event collection Microsoft Defender for Identity – Microsoft Defender for Identity | Microsoft Learn
Create directory service account
You have two ways of using a service account for MDI:
- Group Managed Service Account (gMSA)
- User Account in Active Directory defined as service account
The recommendation is to use gMSA since it provides more security than a regular account. It is more complicated at the beginning but is lower in maintenance.
You need one account for the forest, if it can have read permissions to all the domains. If you have a multi-forest environment where no trust exists, you must create separate accounts for each forest.
If you configure multiple directory service accounts, the sensor will pick the one with an exact match of the domain name. If this does not exist, it will search for an account with the parent domain and so on.
To create the gMSA you must set the first three variables to match your environment.
- $gMSA_AccountName = Account name used for MDI (will be created)
- $gMSA_HostsGroupName = Group name used to add Domain Controllers (will be created)
- $gMSA_HostNames = Domain Controllers and ADFS server
# Set the variables:
$gMSA_AccountName = 'svc_mdi'
$gMSA_HostsGroupName = 'g_mdi'
$gMSA_HostNames = 'DC1', 'DC2'

# Import the required PowerShell module:
Import-Module ActiveDirectory

# Create the group and add the members
$gMSA_HostsGroup = New-ADGroup -Name $gMSA_HostsGroupName -GroupScope Global -PassThru
$gMSA_HostNames | ForEach-Object { Get-ADComputer -Identity $_ } |
ForEach-Object { Add-ADGroupMember -Identity $gMSA_HostsGroupName -Members $_ }

# Create the gMSA:
New-ADServiceAccount -Name $gMSA_AccountName -DNSHostName "$gMSA_AccountName.$env:USERDNSDOMAIN" `
-PrincipalsAllowedToRetrieveManagedPassword $gMSA_HostsGroup.Name
If you get the following error:

New-ADServiceAccount : Key does not existIt means you did not create gMSA yet. Issue the following command to overcome this:
Add-KdsRootKey -EffectiveTime ((get-date).addhours(-10))Now, you can set the required permissions. The gMSA needs read permissions on all objects in your domain. Change the following variable to match your environment: $Identity (use your domain and the value from the above snippit in $gMSA_AccountName)
# Declare the *user* or *group* that needs to have read access to the deleted objects container
# Note that if the identity you want to grant the permissions to is a Group Managed Service Account (gMSA),
# you need first to create a security group, add the gMSA as a member and list that group as the identity below
$Identity = "CONTOSO\svc_mdi"

# Get the deleted objects container's distinguished name:
$distinguishedName = ([adsi]'').distinguishedName.Value
$deletedObjectsDN = 'CN=Deleted Objects,{0}' -f $distinguishedName

# Take ownership on the deleted objects container:
$params = @("$deletedObjectsDN", '/takeOwnership')
C:\Windows\System32\dsacls.exe $params

# Grant the 'List Contents' and 'Read Property' permissions to the user or group:
$params = @("$deletedObjectsDN", '/G', "$($Identity):LCRP")
C:\Windows\System32\dsacls.exe $params
If everything is working, you can install the gMSA account:
# Import the required PowerShell module:
Import-Module ActiveDirectory

# Install the gMSA account
Install-ADServiceAccount -Identity "svc_mdi"
In case of an error, you can reboot your domain controller or try to purge the current Kerberos ticket. To do this use the following command:
klist purge -li 0x3e7SAM-R
To calculate lateral movement paths, Defender for Identity will request a list of members of local administrator group from all devices seen in the network traffic, events and ETW activities. This is done by a SAM-R call to the device.
First, we must create a new GPO that gets applied to all computers except Domain Controllers.
Open Group Policy Editor and create a new or edit an existing GPO.
Navigate to:Computer Configuration\Policies\Windows settings\Security settings\Local Policies\Security options and find the policy named “Network access – Restrict clients allowed to make remote calls to SAM”:

Click on Define this policy setting and then on Edit Security. On the new window click Add…:

Search for the created service account we created earlier. I called it “svc_mdi”. Make sure that you select the Object Types “Service Accounts”, if you used gMSA:

Make sure that the Remote Access is set to Allow:

The last policy is only needed, if you defined in some other policy “Access this computer from the network”. If you have not assigned this policy, you can jump to the next section. Otherwise, see the Microsoft documentation how to implement this: Configure SAM-R to enable lateral movement path detection in Microsoft Defender for Identity – Microsoft Defender for Identity | Microsoft Learn
Set gMSA in Defender for Identity
The last step in the configuration is to configure the gMSA account in the Microsoft Defender for Identity portal. To do this, navigate to Microsoft 365 Defender under https://security.microsoft.com and click on Settings and then Identities:

Select Directory Service accounts and click on Add credentials:

Enter the account name you issued earlier, select Group managed service account, enter the domain information and click Save:

Microsoft Defender for Identity installation
Now you must install the sensor. For this navigate to Settings and click on Identities:

Click on Sensors and then on Add sensor:

On the right side of the window a button says Download installer and an Access key is shown. Download the package and copy the key for the installation:

Put the installer on your Domain Controller and follow the installation instructions.
Conclusion
That is all for the configuration. Watch your M365 Defender portal to see, if there are any issues. There is also a really good blog from Raymond R. who wrote the Microsoft Defender for Identity Configuration Checker. Check it out! It will show you, if you are missing some configurations.
Here is his blog: thalpius.com.
This is my first post this year – so happy new year 😊.
If you have any suggestions or topics you would like to read about, feel free to let me know in the comments or in a private message on social media.
Furthermore, you can connect with me on LinkedIn, Twitter and Mastodon. Thanks for reading and sharing.
Be First to Comment